Get Ready
HAWAII COURT RESURFACING
Windscreen design center
How to measure and install your windscreen
A Step-by-Step Guide to Mastering Windscreens
- Get Ready
- Diagram your court
- Measure
- Install
- Maintain
Get Ready
Take Stock & Get Ready
Why are you adding a windscreen?
The material you choose will determine how well your windscreen performs in a variety of situations. Here are the most common reasons for installing a windscreen:
- Protection from gusting wind
- To see the ball better during play
- To feature your facility’s logo
- To make your courts look more professional
How strong is your fence?
Your fence should be strong enough to support the weight of a windscreen. Most fences can support any Har-Tru windscreen; however, lighter material and a 6’ screen are suggested for lower gauge or weaker fencing.
What else is on your court?
Look for gates and transoms, drop-downs, unusual angles in the fence, and anything else around your court that might affect the windscreen you choose and how you install it.
When you have a good overview of your site, it’s time to make a detailed plan.

Diagram your court
Diagram Your Court
1. Map it out
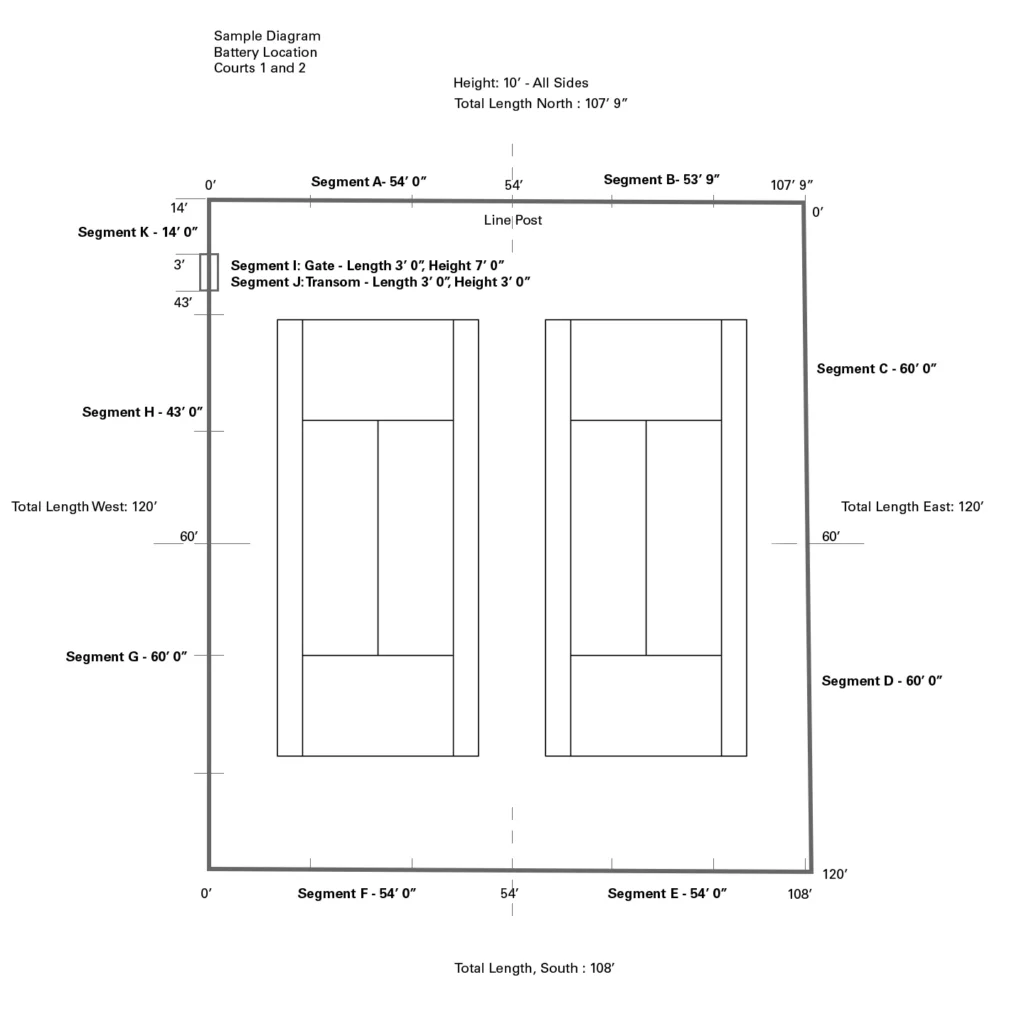
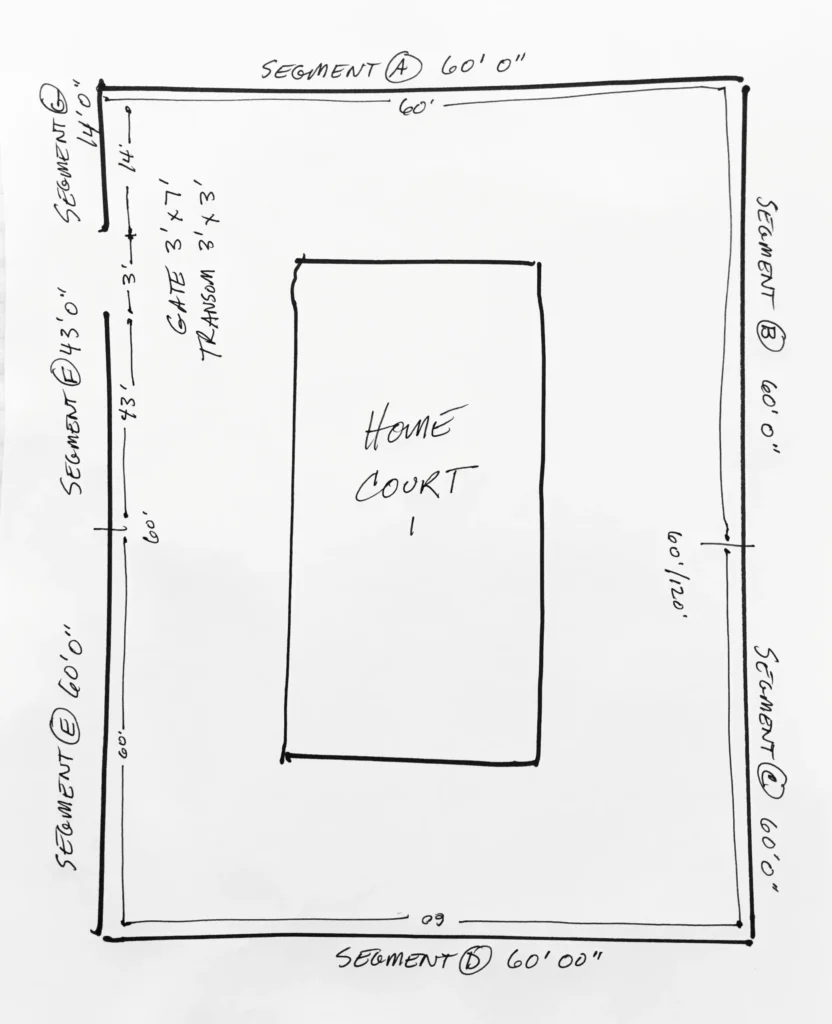
Measuring your fences precisely is critical to getting a great looking, and effective, windscreen. Draw a map of your courts and fence line. Using the instructions below, measure the length and height of each fence segment, and mark those measurements on your diagram. You’ll use this diagram to assemble your windscreen segments during installation.
2. Measure every piece
No two fences are identical. Even if one side of a fence looks the same as another, you need to measure it to be certain. Exact measurements are necessary, including feet and inches. Do not guess or round off dimensions. Measure every segment, and write down the measurements to the nearest inch.
3. Label every piece
Label each segment on your diagram so that when your windscreen arrives, you can put it together correctly and match each segment to the right place on your fence. We’ll ask for a copy of this diagram when you place your order so that each windscreen will be properly labeled when it is shipped to you.
Measure
Measure & Label
Tools
- 100' non-strech tape measure for long fence segments
- 16' or 25' tape measure with a metal blade for gates and transoms
- Your court diagram
- Clipboard
- Something to write with
Measuring Length
1. Secure your measuring tape
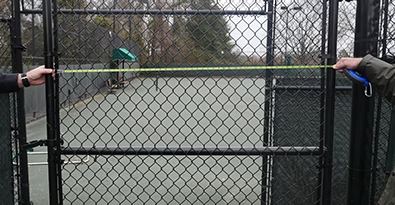
Do not simply hold the measuring tape up to the fence or measure along the ground. This can create slack or cause your measurements to be inaccurate. Hold one end of the tape securely to the beginning point of a segment and pull the tape tight to the end of that segment.
Pro tip
Measuring with only one person
If only one person is measuring, use a hook or carabiner to secure your tape measure to the outside of the tension bar so that you won’t need anyone to hold that end. Pull the tape measure tight to the outside of the next tension bar. Note the length, and then subtract 3”. This creates a measurement that subtracts the width of the tension bars.

2. Pick a starting point and measure clockwise
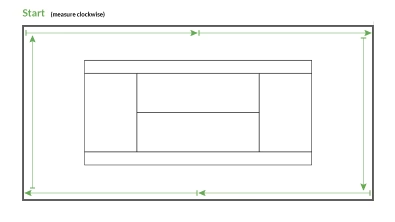
Identify an easy-to-recognize starting point, like a gate or corner post. Start taking measurements at a terminal post, and continue to the next terminal post. Work clockwise to keep your segments in order for purchasing and installing.
Pro tip
Label as you measure
Label each segment on your court diagram as you measure. Include the segment name, and its length and height to the nearest inch.
3. Measure the inside area of the fence
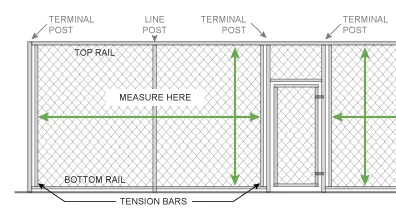
Measure the length from inside tension bar to inside tension bar. The windscreen is installed between the tension bars. Your measurements should not include the width of the tension bars or terminal posts.
Pro tip
When in doubt, opt for a slightly shorter measurement
It’s better to measure a segment an inch too short than an inch too long. Windscreens stretch and exact lengths may vary during manufacturing. If a segment is too long, it won’t have smooth coverage and may sag or look unprofessional.
4. Keep your segments under 60’
For ease of handling and installation, a windscreen segment should be no longer than 60’. If a section of your fence is less than 60’, one segment of windscreen can cover it. For longer fence lengths, break the windscreen measurements into two or more segments that are no longer than 60’ each.

Pro tip
Joining two segments
When the fence length is longer than 60’, you’ll need two or more segments to cover the area. Use a line post as a starting or stopping point. The two segments should meet at a natural breaking point in the fence (the line post), which gives a cleaner look than joining the segments at a random point in the middle of the fence mesh. Do not include the width of the line post in your measurements. Leave a roughly 3” gap (the width of the line post) between the pieces so the you can attach them on either side of the post.

Measuring Height
1. Measure the inside area of the fence
Measure the height of your fence from the bottom of the top rail to the top of the bottom rail.
2. Leave room for air flow when ordering
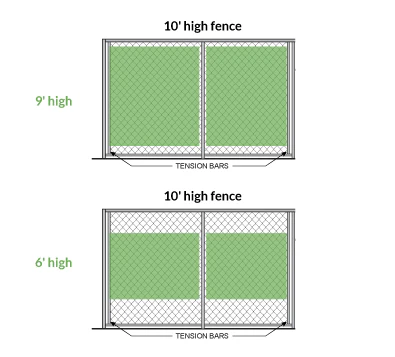
A windscreen height is generally shorter than the height of the fence. For instance, a 10’ fence will usually have a 9’ windscreen. Typically, the windscreen is installed with space at the top and/or bottom of the fence to allow wind flow through the screen.
3. It’s okay to fully cover short fences
For fences shorter than 6’, you do not need to leave as much room for air flow. Measure the height between the top and bottom rails and use that number when ordering.
Gates & Transoms
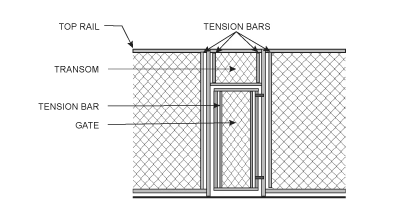
Like other segments, the width of a gate should be measured from inside tension bar to inside tension bar. The height of the gate should be measured from the bottom of the top rail to the top of the bottom rail.
The width of a transom should be measured from inside tension bar to inside tension bar. The height should be measured from the bottom of the top rail to the top of the rail that’s over the gate opening.
Pro tip
Use your small tape measure for gates and transoms
The metal blade on your small tape measure will make it easier to measure gates and transoms, which are overhead.
Install
Install
Preparation
1. Position the screen before you install
To make installation easier, don’t wrestle with your material. A large screen can be heavy. Spread out your panel along the court and gauge your placement before securing it to the fence. Center the screen on its fence segment.

Pro tip
Temporary placement before tying down
Use “S” hooks to temporarily hang the screen on the fence. By lifting the segment, it decreases the weight and makes it easier to attach and tighten the Ty-Rap® at the grommets. S-hooks will hold everything up while you adjust the screen’s placement. Pull the screen taut with each grommet attachment for smooth placement of the screen.
2. Decide what height to hang it from
9′ windscreens are usually hung from the top of the chain-link fence. A typical fence height is 10′, which allows for 1 foot of air space at the bottom. 6′ windscreens, if used on a 10’ fence, are placed in the center of the chain-link fence or 2′ from the top.
3. Hide the seams
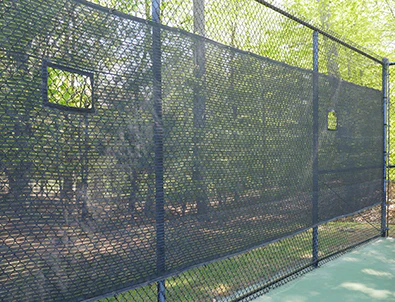
Hang the windscreens so that the seams and hems face the fence and not the court. Leave the smooth side facing the court.
4. Double check your labels
Compare the windscreen segment labels (generated at the manufacturer) to the labels on your court diagram so that each segment is installed in its correct position along the fence.
Fastening
1. Use every grommet
ALL GROMMETS MUST BE USED to secure the windscreen to the fence. Attach every grommet. Do not skip any grommets. Attaching all the grommets distributes the force of high winds. Using fewer grommets results in more load on the grommets that are attached and increases the chances that ties will break. A windscreen can be damaged quickly if it breaks loose and thrashes against the fence.
2. Start with the left edge
Start by fastening the left vertical edge along the tension bar at the desired height. Go from top to bottom, pulling taut as each tie is secured. Use regular (50-lb breaking strength) Ty-Rap®.
3. Secure a portion of the top
Fasten the top of the windscreen to the fence, keeping the top straight by following the chain-link pattern. Pull taut at each grommet. Secure about 10’ of the segment. Use either regular Ty-Rap® or, if the windscreen will be rolled up to the top during high winds, snap hooks or heavy duty 120-lb breaking strength Ty-Rap®.
4. Secure a portion of the bottom
After attaching about 10’ of screen at the top, begin to attach that section at the bottom. Again, pull taut at each grommet to make the screen as wrinkle-free as possible. Use regular Ty-Rap® or, if the windscreen will be rolled down to the bottom during high winds, use snap hooks or heavy-duty 120-lb breaking strength Ty-Rap®.
5. Continue securing the rest of the segment
After the first 10’ of screen is attached at top and bottom, begin a new 10’ section, attaching at the top first, then the bottom, and pulling taut throughout. Continue attaching until you reach the end of the segment.
Pro tip
Attaching Ty-Rap
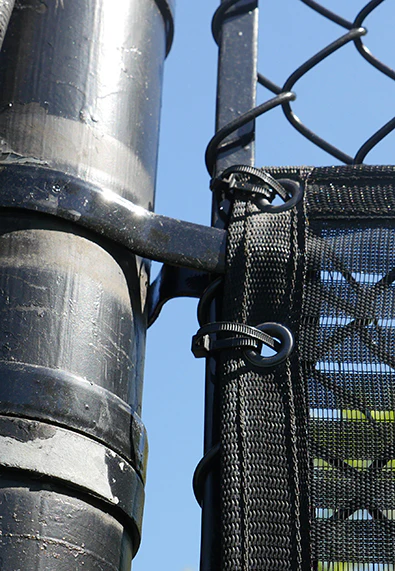
Attach the Ty-Rap® to the fence in the direction the segment is being pulled. As the Ty-Rap® is tightened, it will pull the cover taut. Don’t over tighten as this might result in wrinkling and insufficient room to straighten out the segment. After the segment is completely attached, ties can be further tightened, if necessary, to reduce any remaining wrinkles.
6. Attach the right edge
At the end of the segment, attach the right vertical edge along the tension bar, or next to a line post if more than one segment is needed to cover a long fence. Use regular Ty-Rap®.
7. Inspect and continue
You should now have one completely attached segment that fully covers a section of fence with a smooth, neat, professional appearance. Continue installing any remaining segments using the same method until the entire fence line is covered.
Pro tip
Installing with two people
If two or more people are installing the segment, have one person attach the screen at the top and the second person at the bottom. Have the second person work about 10’ behind the first so that each section installed is pulled taut and wrinkle free.
Anti-Billowing Center Tape
Center tape is used to secure the middle section of a 9’ or higher segment. It’s used to prevent billowing and keep the windscreen securely in place.
When anti-billowing center tape is used, the order in which you fasten the screen may change. Follow the general procedures outlined above, with one of the following variations:
- Top, bottom, middle. After the top and bottom of a section are attached, attach the center tape using regular, 50-lb breaking strength Ty-Rap® through each grommet.
- Middle, bottom, top. Place your anti-billow seam in the middle of the desired height. Then secure the bottom grommets, and then secure the top.
- Top, middle, bottom. Secure the top as described above. Next secure the middle seam, and then the bottom.
As always, pull taut along the way to prevent wrinkles.
Pro tip
Install on a calm day
Don’t install your screens on a windy day. Wind complicates installation and makes it more difficult.
Maintain
Maintain
Windscreen storage and care
You’ve probably invested a lot for your windscreens. To increase their life and durability, and to maintain a wrinkle-free and clean appearance, follow these simple maintenance rules.
Remove or roll screens during winter
In climates that get freezing temperatures, high winds or snow, we recommend that windscreens be taken down for the winter months and rehung in the spring. If windscreens are left on the fences during the winter in these areas, they must be at least rolled up or down and secured.
Roll screens in very high winds
To prevent damage when high winds are expected, cut away the regular Ty-Rap® that you have used for the sides, center tape and either the top or the bottom of the windscreen. Then roll the windscreen up or down to where the snap hooks or heavy-duty Ty-Rap® are attached and tie it up using 14″-long Ty-Rap® to help prevent wind damage.
Roll, do not fold
For storage, roll the screen. Do not fold it. This avoids wrinkling the fabric and makes it last longer and look neater the next time it’s installed.
Cover screens during storage
Store the windscreen indoors. A protective covering over the roll helps reduce dust and dirt on the screen.
Double check your labels
Remember to tag each panel before you remove your windscreen for storage so you can return them to the right place each year.
Define your screen
Choose your custom specifications
Learn more
Explore our How-to Guides
Place order
Make your selections and add to cart
Get in touch with us
Turn leads into customers with less effort today
ALL CONTACTS
- 808-476-3235
- info@hawaiicourtresurfacing.com
- 08 am - 06 pm Sunday closed
- © 2025 Hawaii Court Resurfacing | Powered By Weboptily | Privacy Policy.

